Showing posts with label DIY. Show all posts

Wednesday, May 21, 2014

Losing Your Handiwork

Losing a hand-made for yourself item is a special kind of hurt among crafters. When I was pregnant with my fourth child, I was in New York, went to the yarn shop Stitches and bought this beautiful cotton yarn and made a special yellow, green and white blanket and hat. And months later, somehow, in the jumble of corralling 3 little people and an infant out of church, I left the blanket behind. And never saw it again.

Fast forward to a couple years ago, I had bought this beautiful - I mean beautiful! - green silky yarn and crocheted this intricate, wavy, fan stitch shawl that truly was the envy of many people. It was perfectly light and lady-like and not at all old-lady-shawl-ish.  Then last summer, I was at a conference, and somehow, somewhere, it was separated from me. I still maintain that someone picked it up because otherwise, it would've been somewhere in the vicinity of where I may have left it. Like my daughter's baby blanket, it couldn't have just vanished, right?

And it's not so simple as "oh, just make another one."  Nope.  Primarily because I'm so mad that I lost the piece in the first place, I don't even want to think about it. Then I delude myself into thinking that no, I didn't actually lose it as in never to be found, it's just misplaced, and someone will turn it in to Lost & Found or it fell to the bottom of my closet.  If I just wait and then look later, slowly, it'll ta-da be there.  Note - this method has not worked yet.

Maybe it's a part of life, this losing things. Maybe it's my own frazzled-ness of not keeping track of my stuff.  Maybe it's an unfriendly crochet-stalker that's coming after my yarn. Whatever it is. Losing the work I've put so much time (and money) into is hard.

Let me know in the Comments - Have you lost - or found - a special handmade work?


Join the conversation on Facebook: Just Piddlin' with Frances

Wednesday, February 12, 2014

#WIP - #DIY Decorated Clipboards

If you've read a little bit here, you may have picked up that in some ways, I'm still an old-school paper type of gal.  You know, with the paper planner and all.  So, I still find I need to write stuff down on real paper and I hold it all together on a  good old-fashioned clipboard.  In my organization meetings, for swim meets, counting Girl Scout cookies, kids doodling in the car - I still have a handful of clipboards scattered about the house.  But they're that dull, chipboard, industrial brown.  Boring.

But I've got a couple shelves full of scrapbooking and crafting supplies!  Modge podge, paper, doo-dads - meet plain brown clipboard.


  • Any area that's not going to be covered in paper, paint with basic craft paint.
  • Cover the rest of the clipboard with ModgePodge.  It's okay if it mixes in with the glue.  Lay the paper on top and smooth it out.  Rub out any bubbles and wrinkles.
  • Add any other embellishments you have - flowers, buttons, stickers, letters, ribbons, pictures.
  • If you want a little more shine, or if you might be using this poolside, you can go over the paper with a coat or 2 or 3 of ModgePodge.  (Don't ModgePodge the 3-D stuff, like my flowers.)


Ta-da!  It's such an easy project and you can't mess it up!  You can even do it with a margarita in hand - what else can you ask for?

You can be fancy and make our clipboard functional, too:

  • Print kids' chores and to-do lists, affix the paper to the board
  • Include pictures of your goals, encouraging words - it's a portable vision board!
  • Use the clipboard for your daily to-do and grocery list

Enjoy!

Join the conversation on Facebook: Just Piddlin' with Frances

Wednesday, January 15, 2014

#WIP: I Can Make That (And it's going to be a hat)

A sign of a crafter?  "I can make that" is a constant refrain.  Even more so if their friends show them pictures or point out things in the store and say "can you make that?"  And of course, the answer is "yeah, sure."  Doesn't matter what craft - scrapbooking, sewing, painting, woodcarving, papermaking, gardening, cooking, crochet, knitting.  Once a crafter has decided that they are pretty good at something - and know the relative value of the raw materials - "I can make that" is their response.

So, yeah, I'm one of those people.  I'll blame it on my mom (because I've learned as a mother, everything can eventually be blamed on your mom) because she's the cook who picks through food at a restaurant or watches Iron Chef and says "what's the big deal, I can make that" and then the next thing I know, we're eating stir-fried salmon skin and some kinda soup for dinner.  I've been known to notice a hat or scarf or sweater someone is wearing and try to identify the stitches and yarn used in construction.  I might have on occasion made my husband rewind the news because the reporter had a great scarf on while standing outside in 10 degrees telling us how cold it was or torn out a page in a magazine with a picture of a simple enough sweater or counted stitches on a scarf in the store.  And maybe I have followed someone around who had on a really cute hat.  Maybe.

Which brings me to my current work-in-progress.

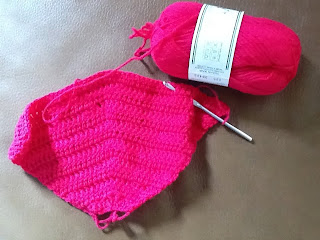
It's going to be a hat... 
Let's say that I saw a woman with a cute little hat on, with a different kind of construction for a hat where the rows went front-to-back across the head rather than in circles or spirals and was gathered on the side.  My friends made that same face you are probably making as I tried to explain it to them, too, but trust me - it was cute.  It seems a bit crazy yarn stalker-ish to go up to someone and say "hey, can I look at your garment or take a picture," so I didn't do that. I just kinda watched her until I got a good picture in my head.  (Don't judge me. You know you've eyed some nice pair of shoes or baby stroller or something.)

I know, it doesn't look like a hat just yet. But there's a swim practice, basketball game, choir rehearsal or some pick-up lane in my near future.  Then it'll be a hat.

As for "I can make that" being the constant loop in our heads?  Let's not even talk Pinterest and Ravelry, right?  But if we're going there, then go there with me - stop by my pages and say "hi!"


Join the conversation on Facebook: Just Piddlin' with Frances

Saturday, March 31, 2012

Craft Challenge - Project #6: Photo Transfer

When I grow up, I would love to be a photographer, either wildlife or travel, or both.  In the meantime, I have easily a couple hundred, okay thousand, pictures stuck on my computer, on memory cards, and piled up on my desk waiting to be displayed in my photo gallery.  And every now and then I get the notion to do something with them.  I would love to frame and hang all of my favorites, but I think my husband would not like our home to be wallpapered in random photos, so I choose carefully.

Window boxes; churros and coffee

Recently, I came across instructions on how to transfer a photo using gel medium onto canvas on another blog, A Beautiful Mess.  Wow - photography and a reason to wander through the craft store?  I immediately put it on my crafts-to-do list.  I used some photos from last summer's vacation, and now that I've got some practice in, I'd like to try it again with pictures of the kids.  I've got some ideas rumbling through my head.

The stuff you'll need:
- canvas - get these at your local craft store like Michael's or ACMoore
- gel medium - wandering thru the paint section was mindblogging; I used Liquidex Gel Medium
- paintbrush
- photos printed or copied on regular paper (not photographic paper) - the blog instructions say to use a laser copy, my husband informed me after the fact, that we have an inkjet printer, so I'm not sure how that affected the project.
- water in a spray bottle


How to (adapted from the original blog instructions):
1. Prepare the photo - this was one of those "trial and error" finds of doing the project.  Trim away all the white area around the picture, I would even recommend trimming just inside the border of the photo - I will do that when I do this project again.  Removing the paper that doesn't have ink on it is almost impossible.

2. Paint the gel medium onto the canvas, covering the surface.  If the picture is smaller than the canvas, you only need to cover enough area for the size of the picture.

3.  Place the photo face down onto the gel medium.  Gently rub the back to press the paper into the medium.

4. Let it dry - a couple hours or overnight.

5.  When the paper and medium are dry, spray lightly with water.

6.  Gently rub the paper away, the ink will remain on the canvas.

7.  Cover the picture with another layer of the gel medium for protection.

8.  Enjoy!


Monday, March 5, 2012

Craft Challenge - Project 4: Baby Blanket

I don't know what's going on lately, but there seems to be a baby boom (that I am glad not to be a part of!) and I've been making one baby blanket after another, barely making it to the next baby.  My kids are even getting pretty good at picking out what yarn and design a baby would like.  There's just something about wrapping a little baby in a soft, comfy blanket and holding them tight so I do enjoy making these unique gifts for the little people coming into the world.

This one I finished the other day but didn't want to post it until after the shower, which was this past weekend.  It's a self-striping yarn, that's probably better suited for knitting than crochet.  The first couple attempts ended up in pooling patches of brown that I didn't like.  I had to play with the pattern awhile to come up with a combination of double-chains and single-chains to get the striping pattern the way I wanted it.  The white stripes have splashed of blue and green, divided by the cafe brown stripes.  And - I forgot to take a picture of it - in one corner, there's a little heart charm.  (The picture's not that great - I was rushing and didn't grab my real camera.)

Welcome to the world, Baby Boy J!

And for mom-to-be, one of my college friends of over 20+ years, and dad-to-be - best wishes for a healthy last trimester, as easy a delivery as possible, and a healthy, beautiful baby.